Connect to Nets eID Broker with OpenID Connect
FoxIDs can be connected to Nets eID Broker with OpenID Connect and thereby authenticating end users with MitID and other credentials supported by Nets eID Broker.
How to configure Nets eID Broker in
- test environment using Nets eID Broker test
- production environment using Nets eID Broker admin portal
It is possible to only request CPR number on the first login and not subsequently logins.
You can test the Nets eID Broker test login with the online web app sample (sample docs) by clicking
Log inand thenNets eID Broker TEST.
Take a look at the Nets eID Broker sample configuration in FoxIDs Control: https://control.foxids.com/test-corp
Get read access with the userreader@foxids.comand passwordgEh#V6kSwthen select theProductionenvironment and theAuthenticationtab.
Configuring Nets eID Broker test as OpenID Provider (OP)
This guide describes how to connect a FoxIDs authentication method to Nets eID Broker test in the test environment.
All redirect URIs are accepted and therefor all clients can connect without prior registration.
This connection use OpenID Connect Authorization Code flow with PKCE, which is the recommended OpenID Connect flow.
Create an OpenID Connect authentication method in FoxIDs Control Client
- Add the Name
- Add the Nets eID Broker test authority
https://pp.netseidbroker.dk/opin the Authority field - In the Scopes list add
mitidto use MitID and optionally thessnscope to request the CPR number (consider only request CPR number once) - Select Show advanced
- Optionally add an Additionally parameter with the name
idp_valuesand e.g. the valuemitidto show the MitID IdP or e.g. the valuemitid_erhvervto show the MitID Erhverv IdP. - Add the Nets eID Broker test secret
rnlguc7CM/wmGSti4KCgCkWBQnfslYr0lMDZeIFsCJweROTROy2ajEigEaPQFl76Py6AVWnhYofl/0oiSAgdtg==in the Client secret field - Add the Nets eID Broker test client id
0a775a87-878c-4b83-abe3-ee29c720c3e7in the Optional customer SP client ID field - Select to Read claims from the UserInfo Endpoint instead of the access token or ID token
- Click Create
That's it, you are done.
The new authentication method can now be selected as an allowed authentication method in a application registration.
The application can read the claims from the authentication method. You can optionally add a*in the application registration Issue claims list to issue all the claims to your application. Or define a scope to issue claims.
Configuring Nets eID Broker as OpenID Provider (OP)
This guide describes how to connect a FoxIDs authentication method to the Nets eID Broker in the production environment.
You are granted access to the Nets eID Broker admin portal by Nets. The Nets eID Broker documentation.
This connection use OpenID Connect Authorization Code flow with PKCE, which is the recommended OpenID Connect flow.
1 - Start by creating an API client in Nets eID Broker admin portal
- Navigate to Services & Clients
- Select the Service Provider
- Create or select a Service
- Click Add new client
- Add a Client name
- Select Web
- Click Create
- Copy the Client ID
- Click Create new Client Secret
- Select Based on password
- Add a name for the new client secret
- Click Generate on server
- Copy the Secret
- Click the IDP tab
- Select MitID and click
Add to pre-selected login options, optionally select others - Click the Advanced tab
- Set PKCE to Active
2 - Then create an OpenID Connect authentication method in FoxIDs Control Client
- Add the Name
- Add the Nets eID Broker authority
https://netseidbroker.dk/opin the Authority field - Copy the two URLs:
Redirect URLandPost logout redirect URL - In the Scopes list add
mitidto use MitID and optionally thessnscope to request the CPR number (consider only request CPR number once) - Select Show advanced
- Optionally add an Additionally parameter with the name
idp_valuesand e.g. the valuemitidto show the MitID IdP or e.g. the valuemitid_erhvervto show the MitID Erhverv IdP. - Add the Nets eID Broker secret in the Client secret field
- Add the Nets eID Broker client id in the Optional customer SP client ID field
- Select to Read claims from the UserInfo Endpoint instead of the access token or ID token
- Click Create
3 - Go back to Nets eID Broker admin portal
- Click the Endpoints tab
- Add the two URLs from the FoxIDs authentication method client:
Redirect URLandPost logout redirect URLin the fieldsLogin redirectsandLogout redirects.
That's it, you are done.
The new authentication method can now be selected as an allowed authentication method in a application registration.
The application can read the claims from the authentication method. You can optionally add a*in the application registration Issue claims list to issue all the claims to your application. Or define a scope to issue claims.
Only request CPR number once
It is possible to let FoxIDs save the uses CPR number in external users. Then the users are only requested for there CPR the first time they login.
To make this happen we will configure the Nets eID Broker authentication method to login without requesting a CPR number and create a profile which do request the CPR number.
On the first login FoxIDs subsequently initiate authentication with the profile to get the CPR number and save the users sub to CPR number relation in a claim on an external user.
In the Nets eID Broker authentication method.
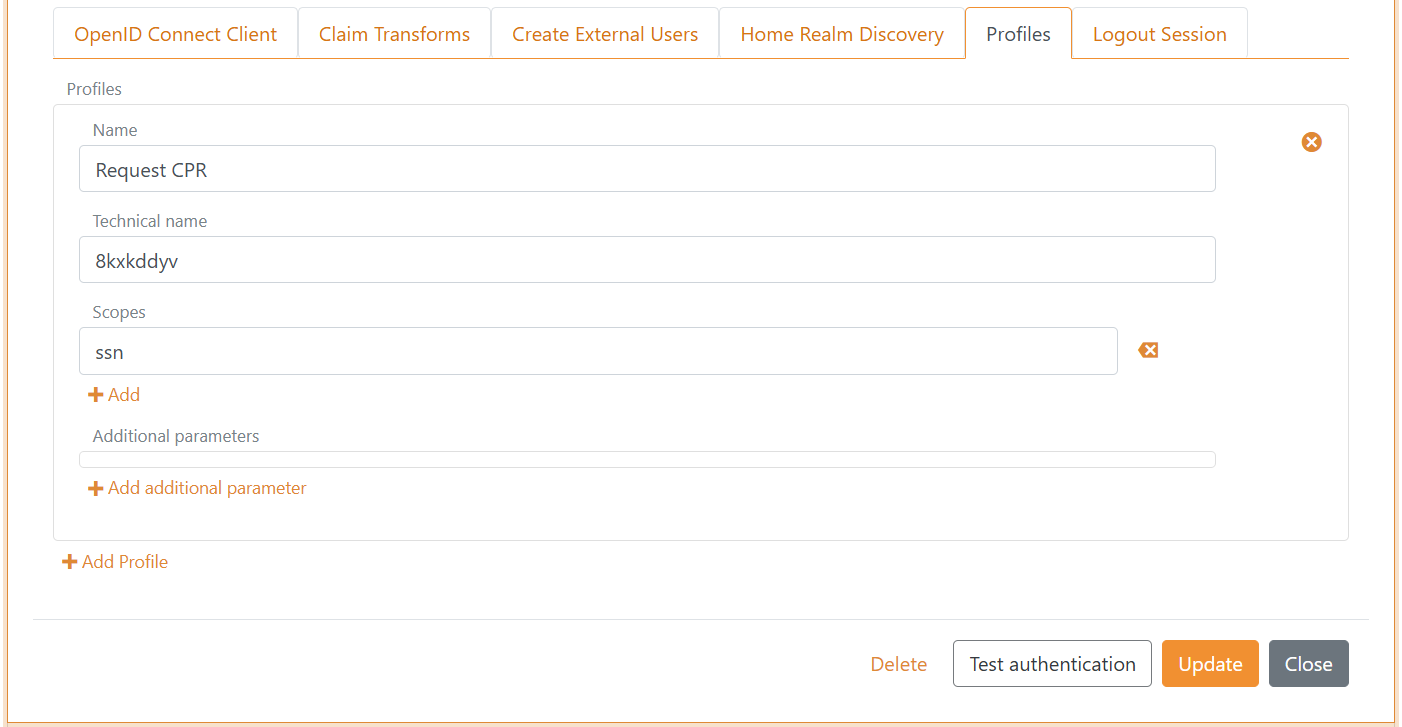
A) First create a profile
- Only include the
mitidscope in the Scopes list - Select Show advanced
- Select the Profiles tab
- Click Add Profile
- Add a Name e.g.,
Request CPR - Add
ssnin the Scopes list - Click Update - Imported before you continue!
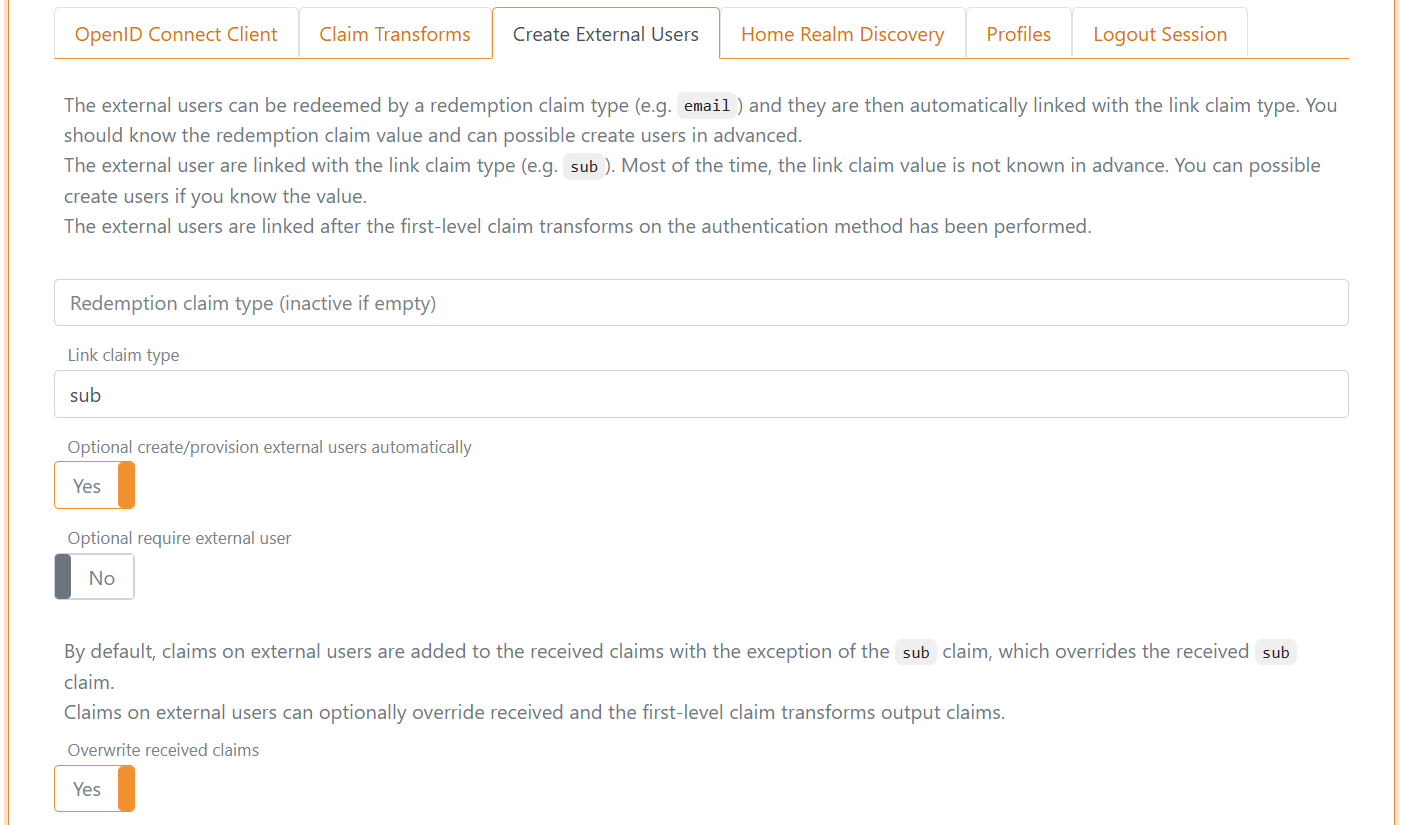
b) Then start to create external users
- Select the Create External Users tab
- Add
subin the Link claim type field - Select Yes in Optional create/provision external users automatically
- Select Yes in Overwrite received claims
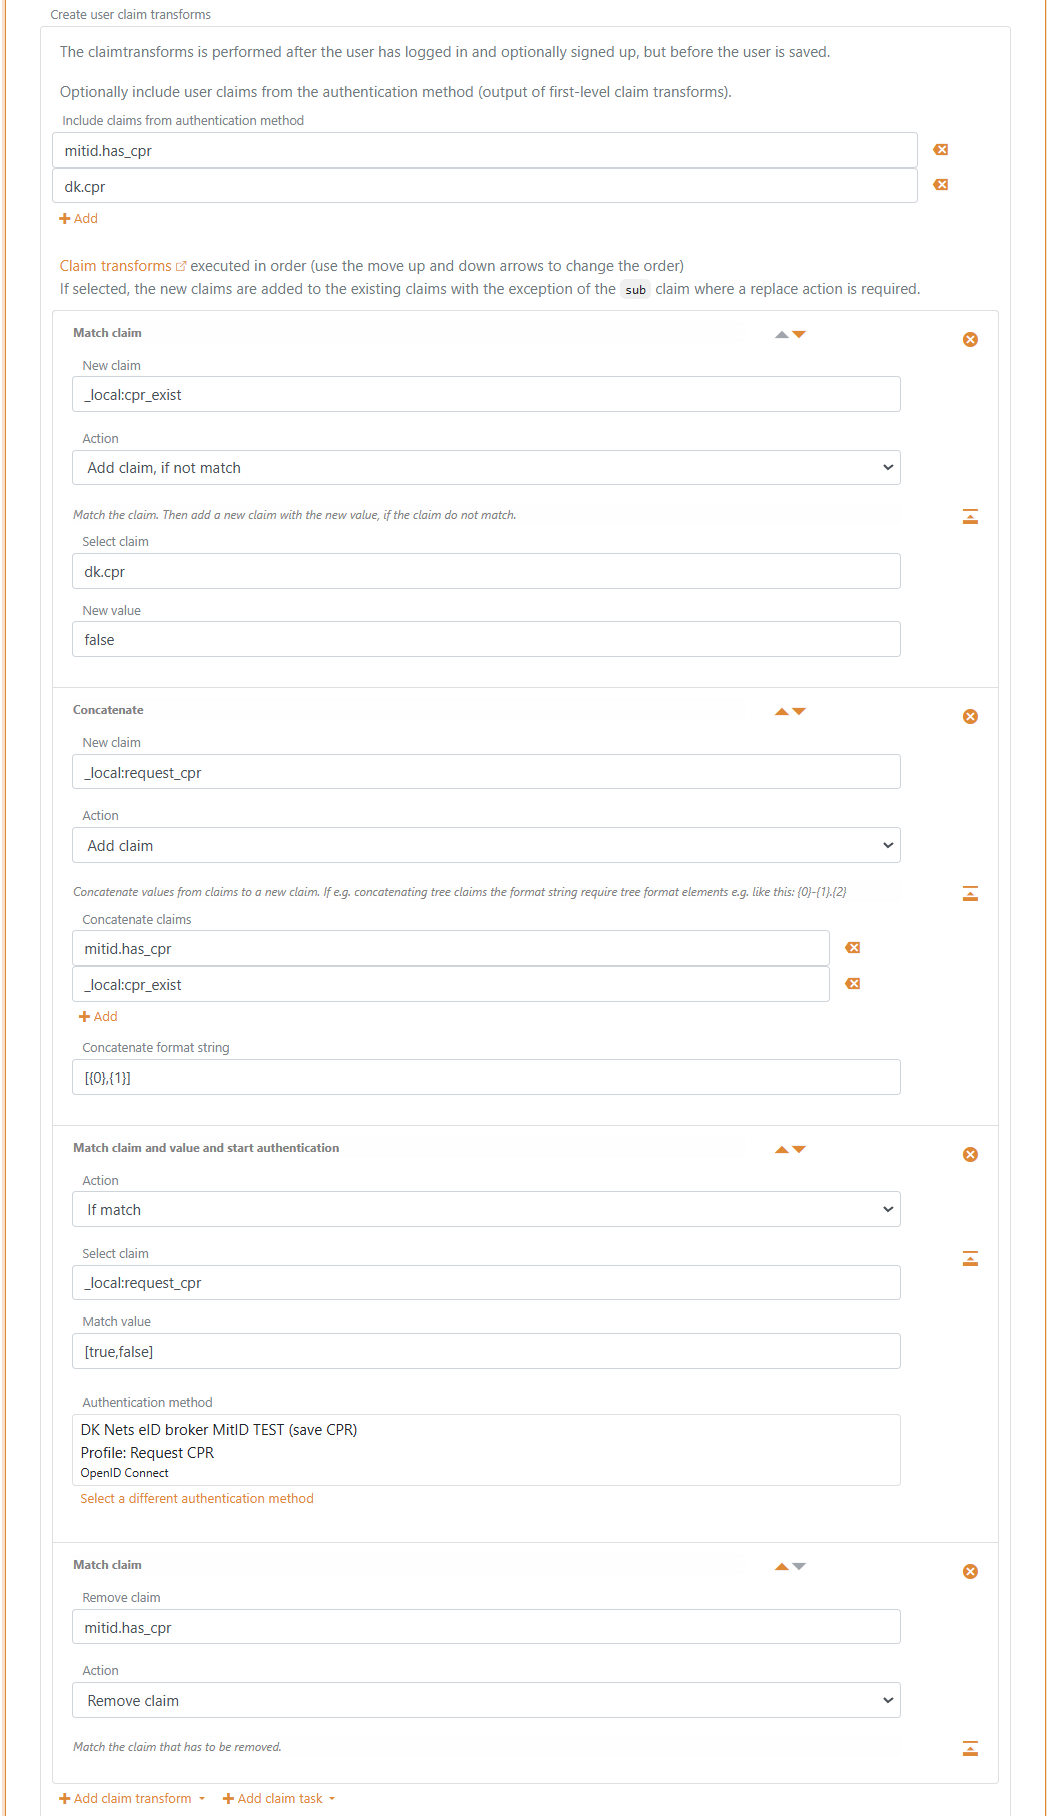
c) Setup claim transforms
- In the Create user claim transforms section in the Create External Users tab
- Add the claims
mitid.has_cpranddk.cprin Include claims from authentication method - Click Add claim transform and click Match claim
- In the claim transformation
- Add
_local:cpr_existin the New claim field - Select Add claim, if not match in Action
- Add
dk.cprin the Select claim field - Add
falsein the New value field
- Click Add claim transform and click Concatenate
- In the claim transformation
- Add
_local:request_cprin the New claim field - Select Add claim in Action
- Add
mitid.has_cprand_local:cpr_existin the Concatenate claims list - Add
[{0},{1}]in the Concatenate format string field
- Click Add claim task and click Match claim and value and start authentication
- In the claim transformation
- Select If match in Action
- Add
_local:request_cprin the Select claim field - Add
[true,false]in the Match value field - Select this authentication methods
Request CPRprofile in the Authentication method
- Click Add claim transform and click Match claim
- In the claim transformation
- Select Remove claim in Action
- Add
mitid.has_cprin the Remove claim field
- Click Update
Scope and claims
You can optionally create a scope on the application registration with the Nets eID Broker claims as Voluntary claims. The scope can then be used by a OpenID Connect client or another FoxIDs authentication method acting as a OpenID Connect client.
The name of the scope can e.g, be nets_eid_broker
The most used Nets eID Broker claims:
idpidp_identity_idloamitid.uuidmitid.has_cprdk.cprmitid.agemitid.date_of_birthmitid.identity_namemitid.transaction_id